Rawr!
Or rather, with these monsters, they'd most likely say, "Gerr, if you please. Cheerio!"
While looking for projects to make with the kids I found this tutorial and pattern for making cute felt monster dolls and thought my seven and four year old would love it!
Well, they did, but then they didn't. I'll explain.
Here is them planning out what is going to go on their monsters. I had to remind them not to make it too complicated or mommy will be sewing all day and remember mommy is lazy. My kids like details, but I was able to get them to pare it down to the essentials.
Next, I doubled up the felt and cut out the shapes of our monsters' bodies. I had to think of something for them to do and to keep them invested in the project while I did this task since cutting through two pieces of thick felt is not a job for kids and I had three patterns to cut out. So they gathered supplies and ate a snack while I tried not prick my fingers with the pins. (which I always do anyway)
When we finally got our bodies cut out we started cutting and gluing the smaller pieces onto the front. This was the fun part! We used fabric glue, but I'd suggest something that dries less hard, maybe Elmers because I had to hand sew some pieces and it's a pain getting the needle through those parts where the glue was thick. Besides I was going to sew over them anyway. The glue was only to keep them in place instead of using pins.
Messes can be fun! ...So can clean up!
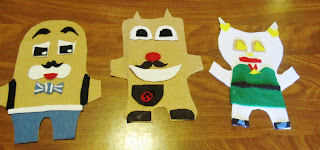
Yay! We got all the pieces we wanted on our monsters! From left to right is mine, my son's and then my daughter's.
I hand stitched the smaller bits like the stripes on the bowtie, the tiny mustache and the ladybug on the pocket, etc. Then I ran the rest of the pieces under the sewing machine, outlining them in white thread since I was too lazy to switch the color thread out to match the felt.
I left a opening to stuff it, but here is where it became not fun. I suggest making the hole considerably larger than normal for the kids because mine complained and moaned and groaned and had a fit over how they couldn't get their hands in to get the batting to the feet and arms. Granted, my children get frustrated easily, but a bigger hole would have been better, and that's totally my fault. So needless to say I ended up stuffing all three! Then I used the sewing machine to close them up. (Do not overstuff! You need room to get the felt under the foot of the sewing machine.)
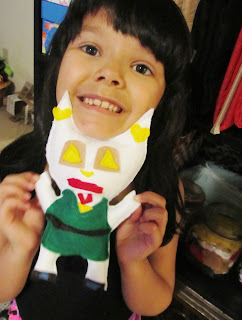
And here is Emily with her fancy fashionista monster! She cut all the pieces out herself and is very proud of her creation. She even took it to school today! That red piece under the mouth is not a goatie but in fact is a necklace. Just thought I'd point that out. :)
This one is mine, a very dapper monster with a mustache, bowtie and suspenders. Like a sir!
And Ethan's! He told me what to cut out and then he glued the pieces on. He insisted on the mustache which looks much better than the one I did for my own monster! I tried to get him to pose with it, but he was still grumpy from the whole "i can't get the stuffing in the monster! Wah!" fiasco. So instead of publishing his Ode to Grumpy Cat face I took it like this.
Despite the drama, they love their monsters and slept with them that night. It was more a project that I did and they just helped and had a fun part in the middle of, rather than a project they can feel they actually completed. But it still turned out super adorable!
Click to It's Always Autumn for the a MUCH better tutorial and PDF pattern!


No comments:
Post a Comment