Thursday, May 30, 2013

Fabric YoYos Tutorial According to Jes


I'm pretty sure you can find hundreds of tutorials and videos online on how to make fabric yoyos. Because, you know, they're all the rage... right? Well, they are to me! And if I have anything to do with it everyone will be wearing these things. Mark my words! This entry is all about how I came to love and make yoyos, and I even attempt a tutorial! If you can read all the way to the end you get a virtual hug from me.

My Yoyo History
I came across them in a lil craft book about four years ago that I bought that the local bookstore, searching for a new craft project, something cute and simple to make. When I saw these fabric flower looking things and how few steps were involved in making them (lazy, remember?) I thought it was perfect for me. Now yoyos and I can't quit each other!

How Others Make Them
A few months into making them I found out stores were selling these plastic dohickey things called YoYo Makers. As soon as I saw them my first thought was: No. It didn't feel right to have a plastic object between me and my yoyos. It felt impersonal, like cheating on a friend. (I have an irrational attachment to nonhuman things okay) Besides, it also looks like an extra and unnecessary step to me... Not that there's anything wrong with it! It just never appealed to me when I already had my own method.

How I Make Them
My way is basically how anyone else makes them without a yoyo maker since there isn't really any other way to do it, honestly...lol! 
They're not perfect, the spacing between the hem stitches aren't identical, but that's what I LOVE about them! Each one is unique and made with love. Yes, love.
So here is my process:

First make circle templates from sturdy cardboard. I made mine from flaps of a box that some Tupperware came in. You can make as many as you want and use just about anything to do it. I used some bowls and jar lids. Or you can be really official and fancy pantsy and use a compass. 
I wrote the measurements on each one (7in, 3in, and 4.5in), just for my own reference and in case you wanted to know what sizes I use for my yoyos. 

Turn the fabric wrong side up and fit as many of all sizes of circle templates as you can, tracing them with a pen or marker. It doesn't matter if it's permanent, the edges get hemmed in.
I love buying fat quarters! They're big enough for small to medium size projects and great if you're ordering online so you can try out different designs of quality fabric without breaking the bank on a whole yard of just one design. Normally I'd have more to work with, but I had some leftover colorful mustache fabric after my Kindle case project, so that is what I'm using for this tutorial. 
Note: If you're wanting to use a yoyo on its flat side instead of the ruffled side make sure to center the circle template exactly where you want the image on the fabric to be after you're finished. 
You'll see later..

When you're done tracing then cut them all out. Personally, I can't ever just sit and watch something on TV or the laptop without having to do something with my hands, and these yoyos are so easy they're great for just that! Also, they keep your hands busy from over snacking. (Not that I let even yoyos stop me from snacking. Still, it helps.)

Now that you have them all cut out, take one in one hand, and a threaded needle in the other. Try and use a complimenting color thread just in case you decide to use the yoyo without covering the hole in the middle. I usually always cover my holes...
ANYWAY, using your thumb, as shown in the photo above, hold down the hem of the circle while doing a simple in and out stitch across from right to left (if you're left handed you'll probably want to do the opposite). Keep going all the way around until you have this:

You just hemmed a yoyo, yo! See that hanging piece of thread to the left? Pull it, tight. 

Pull that thread still attached to the needle until it looks like the photo above. Kind of like a flower bud, yes? Now take that leftover thread and knot it as close to the fabric as possible so it stays scrunched up like that (double knot so it doesn't pop out!), then cut the thread free. (Make sure you have a place to put that needle, a pincushion maybe. Trust me, you don't want to lose it then sit on it later...)

Next, flatten that bud out like a flower in bloom! Push the middle in and carefully use your fingers to pleat the ruffles how you want them. Usually only take about 5 seconds. Super easy and fast!

Here is the other side of the finished yoyo. As I mentioned earlier, sometimes, depending on your project and what design fabric you have, you may want to use the flat side of the yoyo. To do this make sure the image you want is centered under the template before tracing and cutting. I tried to get a green mustache centered on this yoyo, but alas it proved a bit too large for my template. It can still work, though!


All three sizes in a row, front and back, pleated and flat. 

You can do so so SO many cool things with fabric yoyos! 


I like to stack and pair them with coordinating and contrasting colors and patterns, add buttons, and attach them to accessory type things like headbands, clip and pins. 

I'm experimenting with more jewelry-type projects


and incorporating them in other projects!


I'm excited to make them from newer, funkier patterned fabric and to use them in more unique ways.
Visit my Etsy shop, Inedible YoYo Designs, for the yoyo accessories I have on sale!
And if you have any ideas for a yoyo project I'd love to see and hear about them, as well as what you've done with them! 

New Items in my Etsy Shop!

Wednesday, May 29, 2013

Cute Cupcake Kindle Case

Try saying that ten times in a row!

So I made this kindle case for myself:


And had so much fun making it I asked my friends if they wanted one too. Becca, who is also crafty herself, said she wanted one and she wanted something PINK! Well, don't give me that challenge and expect anything less than lol!

I must admit that I started to make this as a tutorial, taking pics as I go, making notes on measurements etc., but as I went along I made mistakes and forgot to take pics of certain things and it was a mess. So perhaps in the future I will make a more concise tutorial on how I made these. But for now enjoy these pics! She hasn't seen it yet and has no idea I added the cupcake. hehehe


Isn't it puuuurdy?! 


The cupcake is from a piece of cupcake themed fabric that I cut out and embroidered on the flap. CUTE!


I forgot to add the contrasting hem, like in the mustache case above, because I had originally cute them too small and was too lazy to cut out wider pieces. Such is my life. But since it was done with the sewing machine it still looks clean and finished. I hand stitched some velcro to the flap and inside, above the pocket. Note: Place the actual kindle INSIDE the case to determine where the velcro should go before sewing it on. I made that mistake and when I inserted the kindle after the velcro was on they didn't match up. 

I hope she likes it! Do you think there is enough PINK?! :D

Tuesday, May 28, 2013

Fanciest Felt Monsters


Rawr!
Or rather, with these monsters, they'd most likely say, "Gerr, if you please. Cheerio!"
While looking for projects to make with the kids I found this tutorial and pattern for making cute felt monster dolls and thought my seven and four year old would love it!


Well, they did, but then they didn't. I'll explain.

Here is them planning out what is going to go on their monsters. I had to remind them not to make it too complicated or mommy will be sewing all day and remember mommy is lazy. My kids like details, but I was able to get them to pare it down to the essentials.


Next, I doubled up the felt and cut out the shapes of our monsters' bodies. I had to think of something for them to do and to keep them invested in the project while I did this task since cutting through two pieces of thick felt is not a job for kids and I had three patterns to cut out. So they gathered supplies and ate a snack while I tried not prick my fingers with the pins. (which I always do anyway)


When we finally got our bodies cut out we started cutting and gluing the smaller pieces onto the front. This was the fun part! We used fabric glue, but I'd suggest something that dries less hard, maybe Elmers because I had to hand sew some pieces and it's a pain getting the needle through those parts where the glue was thick. Besides I was going to sew over them anyway. The glue was only to keep them in place instead of using pins. 


Messes can be fun! ...So can clean up!


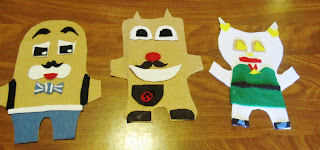
Yay! We got all the pieces we wanted on our monsters! From left to right is mine, my son's and then my daughter's. 


I hand stitched the smaller bits like the stripes on the bowtie, the tiny mustache and the ladybug on the pocket, etc. Then I ran the rest of the pieces under the sewing machine, outlining them in white thread since I was too lazy to switch the color thread out to match the felt. 

I left a opening to stuff it, but here is where it became not fun. I suggest making the hole considerably larger than normal for the kids because mine complained and moaned and groaned and had a fit over how they couldn't get their hands in to get the batting to the feet and arms. Granted, my children get frustrated easily, but a bigger hole would have been better, and that's totally my fault. So needless to say I ended up stuffing all three! Then I used the sewing machine to close them up. (Do not overstuff! You need room to get the felt under the foot of the sewing machine.)


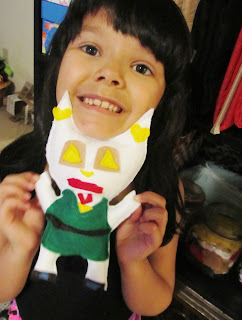
And here is Emily with her fancy fashionista monster! She cut all the pieces out herself and is very proud of her creation. She even took it to school today! That red piece under the mouth is not a goatie but in fact is a necklace. Just thought I'd point that out. :)


This one is mine, a very dapper monster with a mustache, bowtie and suspenders. Like a sir!


And Ethan's! He told me what to cut out and then he glued the pieces on. He insisted on the mustache which looks much better than the one I did for my own monster! I tried to get him to pose with it, but he was still grumpy from the whole "i can't get the stuffing in the monster! Wah!" fiasco. So instead of publishing his Ode to Grumpy Cat face I took it like this. 


Despite the drama, they love their monsters and slept with them that night. It was more a project that I did and they just helped and had a fun part in the middle of, rather than a project they can feel they actually completed. But it still turned out super adorable!

Click to It's Always Autumn for the a MUCH better tutorial and PDF pattern!


Sunday, May 26, 2013

Headbands yo!...yo.

Remember when I said I make yoyos?
Remember when I talked about my Etsy shop where I make and sell yoyos?
Well, I made some more, but this time they're bigger and awesomer!
I combined more than one and attached them cool-like (Maybe not so cool since I did use a hot glue gun... anyway, semantics.) on some sturdy headbands. You know, the ones that won't slowly creep up toward your crown and pop off your head like a sling shot? Does this only happen to me...?


I have yet to take official individual photos and list them on Etsy, but I was too excited to wait to share. And all together like this they just look so scrumptious, don't you think? Yum.

Saturday, May 25, 2013

Simply Cute Felt Owl Phone Case


My daughter had been begging and prodding and reminding me to make her a case for her cell phone for weeks. Keep in mind she is 7 years old and her "cell phone" is one of my older Androids which she uses to play games via wifi. Still, it makes her feel grown up and important. Also, if you can do anything to make a child feel special I say do it...

Anyway, this isn't a blog post about parenting, this is about crafts, yo! We are a family of cupcake lovers, but also one who adores owls. So when I asked her what she wanted on her phone case - well, at first she said Fluttershy from My Little Pony and I wasn't about to look up how to do that - I suggested an owl since her entire bedroom set is owl-themed, and she agreed. Whew! Complicated embroidery and cutting of tiny felt pieces averted. (I should add that I'm also lazy... anyhoo!)

So this is what she and I came up with. She picked all the felt colors and fabric and I sewed it together using a combination of hand sewing and... a sewing machine! I'm excited because my mother is letting me borrow hers and what would have taken me an hour to do by hand (the edges of the case) took less than 3 minutes on the sewing machine.

I'm in love.


Friday, May 24, 2013

Grumpy Cat, Where Your Legs At?

Who doesn't love this sweet, furry and adorable ball of negativity? The cat with a permanent expression of disagreement speaks to all of us, particularly to our cynical side, the side that hates humanity and joy. However,  no matter how pessimistic or uninterested Grumpy Cat, aka Tardar Sauce, tries to be we all still love her! She has become the most beloved cat of the year and she could give a rat's butt about it.

So in honor of Grumpy Cat, I searched for a tutorial on how to make a plush version for a friend of mine who loves Grumpy Cat just as much as I do. I found one over at Liz Makes that I thought was precise in its instructions and super awesome!

I made just a few changes (I hand-stitched everything, didn't have pink felt so I satin stitched the nose and mouth, accidentally stitched the tail and ears to the wrong side and had to cut the body shorter, and I used a blanket stick around the edges instead of sewing it like a pillow), but let's compare, shall we?

Here is her finished Grumpy Cat plush in it's well-lit and photographed glory:


And here is mine, taken with my camera phone and filtered through Instagram... :


Oh, she hates it so much!! XD

Check out the tutorial that I followed if you want to make one of your own!


Thursday, May 23, 2013

There's a Cupcake on our Head!

I love cupcakes.
I have no shame in saying so.
I LOVE CUPCAKES!
About three years ago I even seriously contemplated starting up a cupcakery... but although I enjoy baking I'm not a huge fan of being in a kitchen all the time. Plus, it was too much red tape. My procrastination, impatience and general flakiness can't handle that kind of commitment.
Anyway...
I can make them and eat them and never tire of them ever and never. They can be either super cute or simple, but they're always delicious!
My kids know of my obsession for these hand-sized parcels of sugar and joy and you won't hear them complaining! They certainly seem to enjoy the fruits of my addiction obsession.
So what better way to showcase our family affection for cupcakes than sending my oldest child off to school with a big 'ol felted cupcake attached to a headband?
I made this while Emily was sleeping and when she saw it the next morning she was ecstatic! The warmth in my heart could easily compete with a 375 degree heated oven in the middle of a cupcake baking session...


The Art of Jes

I draw things!!
I draw things with pencils!
I also have a website where I charge people to draw whatever they want me to and then I send them that drawing. Isn't that neat? So now you're wondering, is she any good that she expects people to throw their hard-earned Paypal money at her? Well, maybe I am, maybe I'm not, you be the judge. And if you like what you see and you start thinking like one of those people who feel they have to have me draw their baby, pet cat, grandparents, a landscape or even a pile of cups and spoons, I can do that for you. Guaranteed.
Here are some examples of my work. But you can go to my website for more galleries and information on what needs to be done to get one of your own. Please note, not all prices are set in stone. ;)


Pricing for Commissioned Artwork
  • 5x7 of one subject $30.00 
  • Each additional subject for 5x7 $15.00
  • 8x10 of one subject $100.00 
  • 9x12 of one subject $175.00
  • 11x14 of one subject $200.00
  • 14x17 of one subject $300.00
  • Each additional subject for 8x10 and above $50.00 
  • Flat fee shipping for all sizes:
  • $10.00 USA
  • $15.00 Canada
  • Other International orders and shipping costs upon request
Go to The Art of Jes commission page for contact information and steps to obtaining a commission from me.